A-frame shelter from natural materials
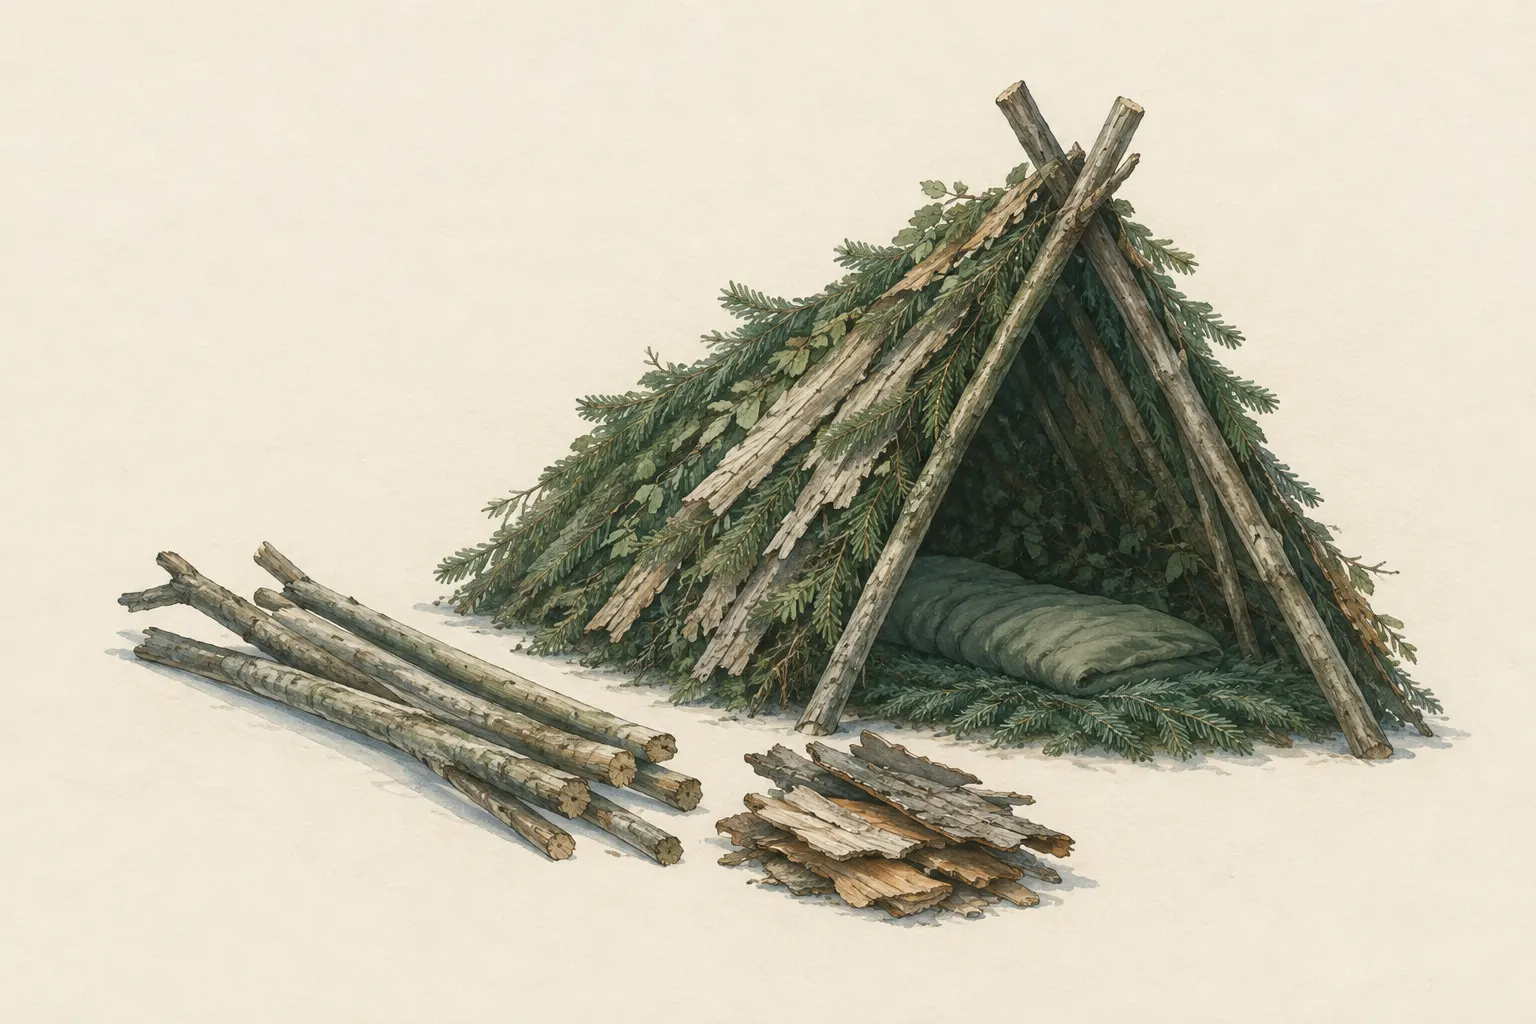
A ridged roof of a ridgepole, bipods or forked sticks and poles leaned against it, covered with branches, bark from deadwood or leaves. Larger than the narrow debris hut and meant for one or two people, it mainly protects from rain and wind – it only keeps you warm with good ground insulation and a sleeping bag.
- Several hours
Explained simply
From the front an A-frame looks like the letter “A” – or like a pointed house roof sitting right on the ground. At the top lies a long, sturdy pole, the ridgepole. On both sides you lean many sticks against it at an angle. Then you cover everything with branches, bark pieces from dead wood or leaves, from bottom to top like roof tiles.
A roof like this keeps off rain and wind. But it only gets warm underneath if you separate yourself well from the cold ground – with a thick layer of dry material or a sleeping pad – and have a sleeping bag.
Before you lie inside, check that everything is stable. A rotten pole can break, and the heavy covering then falls on you.
How it works
Two steep roof surfaces shed rain outwards and keep out wind. For this to work, the roof has to be steep enough: if it is too shallow, water stays in the covering and seeps through instead of running off. Material laid overlapping from bottom to top improves this considerably – each upper layer covers the gap in the one below.
Everything is carried by the ridgepole. At both ends it rests on a bipod (two poles crossed and tied at the top), in a forked branch or on a sturdy stump. Against it lean the rafters, the sloping sticks that hold the covering.
Compared with the narrow debris hut, the interior is larger – enough for one or two people. But more room also means more air that your body would have to warm. The insulation therefore has to come mainly from the ground layer and the sleep system, not from the roof.
What really matters
The real work lies in the covering. A tight roof needs far more material than most people expect – often many times what looks like enough at first glance. So plan for the time and effort and build smaller rather than too large. A shelter that is too big never becomes properly tight.
If a tarp or plastic sheet is available, lay it under the outer layer of natural material. Without it, a natural roof is usually only partly waterproof in prolonged rain.
Choose the site carefully: level, dry, no hollow where water collects, no dead wood above you, but deadwood nearby so you do not have to carry far. There are no fixed figures for roof pitch or layer thickness – it depends on the material. Check from inside: if you can see light through the roof, rain will get through too.
Safety: what to watch out for
The ridgepole and its supports must safely carry the weight of the covering – and wet material is considerably heavier than dry. Do not use rotten poles. Shake the frame firmly before lying inside and check whether anything gives.
Look up: dead trees and hanging branches can fall in wind or under snow load. Use a saw or hatchet only with safe technique. Many injuries while building shelters are caused by tools, not by the shelter itself. Work slowly, with firm footing and at a distance from other people.
Collecting material and building shelters are regulated very differently by region. Do not tear branches from living trees, get the landowner's permission for practice and dismantle the structure afterwards.
When it makes sense – and when not
A natural A-frame is worthwhile when you have time, enough deadwood and loose material are available and you need a shelter without a tarp for one or more nights. For two people it is a good size.
It is no good as quick shelter as darkness falls – building takes a long time. Then an emergency bivouac with an emergency blanket or bivy bag in a sheltered corner is usually the better choice. In protected areas and places without enough deadwood this design is out of the question.
How to practise it
Practise with permission on a day with good weather and allow several hours. Start with the frame and test its stability before covering it. Time how long it takes you to collect the material – that is the best lesson in how much work a tight roof is.
Test the roof by pouring some water over it or by waiting for a shower, and see where it drips. Afterwards dismantle everything and scatter the material in the forest again so that no traces remain.
Step by step
Choose the site
Level, dry spot, no hollow, no dead trees overhead, deadwood nearby.
- 1
Choose the site
Level, dry spot, no hollow, no dead trees overhead, deadwood nearby.
- 2
Erect the supports
At each end set up a bipod of two crossed poles tied at the top – or use forked branches or a sturdy stump.
- 3
Place the ridgepole
Lay a sturdy ridgepole into the forks and secure it.
- 4
Lean on the rafters
Lean poles densely and steeply on both sides.
- 5
Thatch
Cover from bottom to top, overlapping, with branches, bark pieces from deadwood or leaves; if available, a sheet under the outer layer.
- 6
Insulate the floor
A thick layer of dry material or a sleeping pad as the sleeping surface.
Common mistakes
- Roof too shallow – it drips through
- Material not overlapped
- Built too large
- Stripping branches from living trees
- Not dismantling after practice
Quick view
Materials
Sturdy sticks / poles
Ridgepole, supports and many roof poles from deadwood
Do not cut live wood where prohibited.
Dry leaves, grass or conifer boughs
For covering and as a floor layer
Collect only where allowed; no protected plants. Check for ticks and insects.
Thin twine
To lash the supports
Low breaking strength – light loads only.
Plastic sheet / large bin bag
Under the covering for better rain protection
Tears easily; never pull over the head (suffocation risk).
Do not use for drinking water unless food-grade.
Suitable for
- Emergencies in the forest without a tarp when time is available
- Camps lasting several days where permitted
Not suitable for
- Quick shelter as night falls
- Protected areas
- Areas without enough deadwood
Prerequisites
- Permission to collect and build
- Enough deadwood
- Plenty of daylight
Safety
- Use a saw or hatchet only with safe technique; many injuries while building shelters are caused by tools.
- Wild camping, bivouacking, collecting material and fires are regulated very differently from region to region. Check local rules, do not damage living trees and leave the site without a trace.
How it works
Two steep roof surfaces shed rain and keep out wind. The roof pitch must be steep enough for water to run off rather than seep through; material laid like roof tiles from bottom to top improves this. The interior is larger than in a debris hut and therefore cooler – insulation has to come from the ground layer and the sleep system.
Advantages
- No special tools strictly required
- More room than the debris hut
- Good rain protection with a steep, dense roof
Disadvantages
- Very high time and material cost
- Cooler than narrow shelters
- Disturbs nature and is prohibited in many places
Deep knowledge
Background
Pole frames with a natural roof are among the improvised shelters described in FM 3-05.70. The real work lies in the covering: a tight roof needs far more material than most people expect.
Anyone who may not or does not want to damage living trees depends on deadwood and loose material. For practice, always get the landowner's permission and dismantle the structure afterwards.
Variants
- With a tarp as the skin
- A tarp or sheet over the frame saves a lot of covering material; branches laid on top hold it down in wind.
Common mistakes
- Roof too shallow – it drips through
- Material not overlapped
- Built too large
- Stripping branches from living trees
- Not dismantling after practice
Limits and risks
- No figures for roof pitch or layer thickness
- Without a sheet, only partly waterproof in prolonged rain
Material alternatives
Derived from material properties: a substitute must have all relevant properties. Observe the notes on the substitute.
- Dry leaves, grass or conifer boughs
- Sleeping pad, Backpack, Dry spare clothing (Carry it in waterproof packaging – wet clothing barely insulates.), Wool blanket / duvet (Keep away from candles, stoves and heaters.), Insulated cool box (Keeps cold only for a limited time; without ice packs or ice it is not a fridge.), Sleeping bag (Do not store compressed long-term; do not pack away damp.), Newspaper and cardboard (Flammable – keep away from candles, stoves, heaters and embers.), Insulated cooking box (hay box, thermal cooker) (Never put open flame or embers inside – only the hot, closed pot.)
- Thin twine
- Rope (Never use unknown or damaged rope for life-safety purposes.), Paracord (Not a climbing or safety rope.), Accessory cord (Use only certified cord after training for life-safety purposes.), Webbing (tubular webbing) (Inspect knotted webbing before every use.), Jute or sisal twine (bought) (Low strength, absorbs water and rots – light loads and practice only.), Tree straps (Load only within the manufacturer's limits.)
- Plastic sheet / large bin bag
- Tarp, Emergency blanket (Tears easily once punctured; short-term shelter only.), Document folder (waterproof) (Store securely – contains sensitive personal data.), Rain poncho (When used as a shelter, it no longer protects your body from rain.), Bivy bag (Never fully close off the face.), Tent (Do not cook or heat inside the tent (fire and carbon monoxide danger).), Heavy-duty bin bag (large) (Suffocation risk: never pull plastic bags over the head or face and keep them away from small children.), Group shelter bag (Airtight – ventilate regularly.)
Results come exclusively from structured entries. No improvised instructions are generated.
Sources
Headquarters, Department of the Army (USA) (2002): FM 3-05.70 Survival
Principles of improvised shelters, site selection and shelter construction
Leave No Trace Center for Outdoor Ethics: The Seven Principles of Leave No Trace (Principle 5: Minimize Campfire Impacts)
Principles for low-impact camping