Tarp A-frame
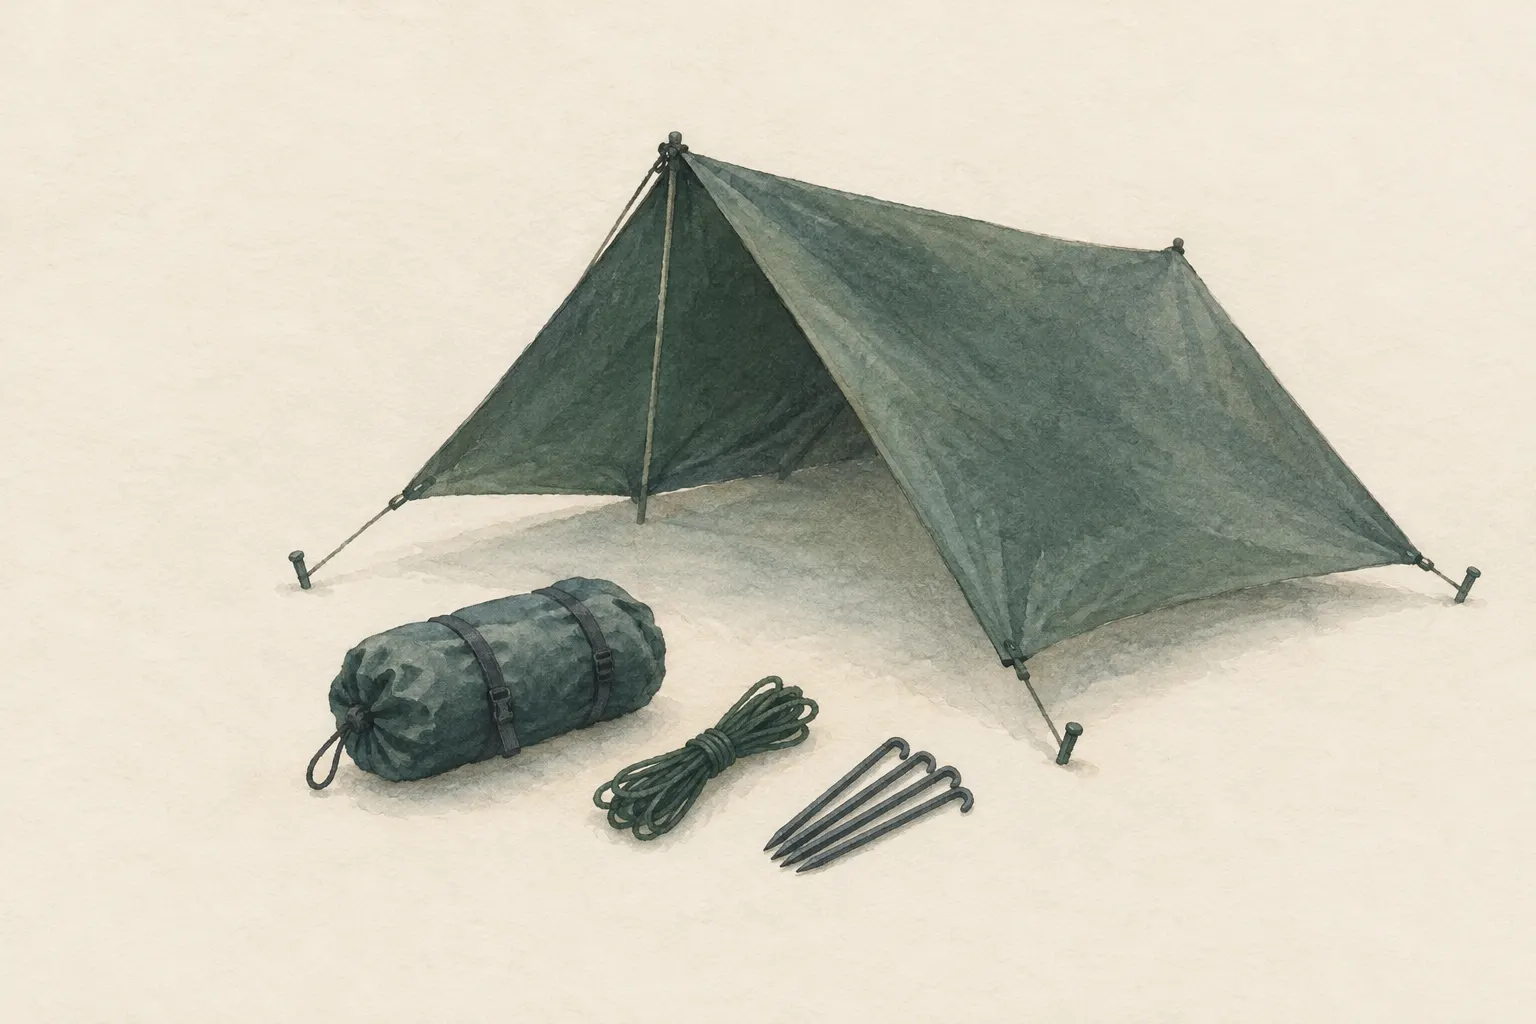
A tarp is draped symmetrically over a tensioned ridgeline and staked out at all four corners. The A-frame protects from rain on both sides and, with the narrow end turned into the wind, gives reasonable wind protection.
- 15–30 minutes, less with practice
Explained simply
A tarp is a large waterproof sheet with eyelets or loops along the edge. For an A-frame you tie a line between two trees and lay the tarp over it like a blanket over a washing line. From the front it then looks like the letter “A” or the roof of a house.
Rain runs down the tarp on both sides, just like water off a roof. To stop it flapping, you pull the four corners diagonally outwards and fix them in the ground with tent stakes or sticks. You turn the narrow end into the wind so it slips past the tarp instead of blowing into it.
The tarp protects you from above but not from the cold ground – you still need a sleeping pad underneath. And you never cook or make a fire under the tarp.
How it works
The tensioned ridgeline is the roof ridge, the top edge of the roof. The tarp hangs evenly over it, and the two roof panels shed rain outwards. Because the tarp protects on both sides, you are still sheltered if the wind shifts a little. That is what makes the A-frame so forgiving.
The roof pitch is a compromise. With a steep roof, water runs off quickly and the wind finds little to push against – but you have less room. With a flat roof, you have more space, but rain can pool in sags and the wind pushes harder. In bad weather you pitch lower and steeper, in calm weather higher.
Orientation decides a lot. With a narrow end facing the wind, the air flows along the tarp. If, on the other hand, the open long side faces the wind, the tarp acts like a sail and rain is driven inside.
What really matters
The ridgeline must be taut. If it sags, the whole roof sags and the panels wrinkle. Good knots help: a secure attachment knot at one end and a tensioning hitch at the other that lets you tighten it later. Important: the ridgeline only carries the roof – it is never meant to secure or hold people.
Wrinkle-free panels are not a cosmetic detail. Rainwater collects in wrinkles and sags, the weight pulls the tarp down further, and sooner or later it drips or runs inside. Pull the corners diagonally outwards and the panels tension evenly.
Water can also creep along the ridgeline under the tarp. A short piece of cord hanging from the line just before the tarp acts as a drip line: the water runs down it and drips off outside. Many tarps and lines stretch when wet – so re-tension after a while and when the weather changes.
When it makes sense – and when not
The A-frame suits rain with shifting wind direction, one or two people and woodland with suitable, healthy trees. Without trees you can pitch it with two trekking poles; the poles only stay stable, however, if the guylines pull outwards in line with the ridgeline.
It is less suitable in storms in exposed places, in heavy snowfall with a flat roof (snow is heavy and pushes the tarp in) and in terrain with neither anchors nor poles. Driving rain can blow in through the open ends.
In strong wind a low storm A-frame helps: ridgeline low, sides down to the ground. You then have little room, but the tarp offers the wind much less surface. A lean-to offers more room but protects from one direction only.
Safety: what to watch out for
Use only healthy, living trees as anchors and look up before pitching. Dead branches above the tarp are the most commonly overlooked hazard. They break more easily in wind or under snow load.
Never cook or make a fire under the tarp. Many tarp fabrics melt or burn after even brief contact with flames or sparks. Carbon monoxide – a gas you can neither see nor smell – can also collect under a low-pitched sheet.
The tarp does not insulate from the ground. Anyone lying only on a thin groundsheet loses a lot of heat downwards at night. A sleeping pad or a thick layer of dry vegetation always belongs underneath.
How to practise it
Pitch the A-frame first in a garden or park in good weather, without time pressure. Practise the knots at home beforehand until you can tie them without thinking – everything gets harder with cold, wet fingers.
Then time yourself and try to become quicker and neater. Try out different heights and lie underneath each time: how much room do you have, where would rain blow in?
Once you feel confident, practise in light rain close to home. That way you learn what wetness, stretching and re-tensioning feel like without anything bad being able to happen.
Step by step
Choose site and orientation
Choose a safe site between two sturdy trees. Orient the long axis so that one narrow end faces into the wind.
- 1
Choose site and orientation
Choose a safe site between two sturdy trees. Orient the long axis so that one narrow end faces into the wind.
- 2
Rig the ridgeline
Tie the line to one tree with a bowline or clove hitch and tension it at the other with a taut-line hitch or two half hitches. Set the height so you can sit underneath; lower it in wind.
The ridgeline is a roof ridge only – never use it to secure or hold people.
- 3
Drape the tarp
Lay the tarp centrally over the line so both sides hang down equally. Attach any centre tie-outs to the ridgeline.
- 4
Stake the corners
Pull the four corners diagonally outwards and stake them with tent stakes or sharpened sticks. Make the guylines adjustable with a taut-line hitch.
- 5
Tension wrinkle-free
Tension the panels so no pockets form where water can pool. Stake the side edges lower in rain.
- 6
Drip line and ground
Hang a short piece of cord from the ridgeline just before the tarp so water running along the line drips off there. Place a pad or groundsheet under the tarp.
- 7
Re-tension
Re-tension after a while and when the weather changes – wet lines and tarps stretch.
Common mistakes
- Turning the broad side into the wind
- Rigging the ridgeline too high so rain drives in from the side
- Slack panels where water pools
- Pitching under dead branches
- Going without ground insulation
Quick view
Materials
Tarp
Paracord
For ridgeline and guylines
Not a climbing or safety rope.
Rope
Alternative for the ridgeline
Never use unknown or damaged rope for life-safety purposes.
Tent stakes
Sturdy sticks / poles
As a substitute for stakes
Do not cut live wood where prohibited.
Trekking poles
As supports where there are no trees
Sleeping pad
The tarp does not insulate from the ground
Suitable for
- Rain with shifting wind direction
- A night for one or two people
- Woodland with suitable trees
Not suitable for
- Storms in exposed terrain
- Heavy snowfall without a steep roof pitch
- Terrain with neither anchors nor poles
Prerequisites
- A tensioning knot (e.g. taut-line hitch) and an attachment knot
- Two sturdy anchor points at a suitable distance, or poles
Safety
- Use only healthy, living trees as anchors and check for dead branches above before pitching.
- Do not run a stove or fire under the tarp – fire and carbon monoxide risk.
How it works
The tensioned ridgeline carries the tarp like a roof ridge; the two roof panels shed rain outwards. The steeper the pitch, the better water runs off and the less surface the tarp presents to the wind, at the cost of interior space. With the narrow, more closed end turned into the wind, the wind flows along the tarp rather than into it.
Advantages
- Protection on both sides
- Tolerates shifting wind better than a lean-to
- Good ventilation through the open ends
Disadvantages
- Less usable space than a lean-to
- Open ends let driving rain in
- Needs anchors or poles
Deep knowledge
Background
The A-frame is the classic basic tarp pitch and a good starting point because it is forgiving: if the wind shifts, you are still protected on two sides. Many other pitches – for example closing the ends by folding the corners in – are variations of it.
The quality of the pitch depends less on the tarp than on site, ridgeline height and tension. A taut ridgeline, wrinkle-free panels and a height matched to the weather achieve more than a bigger tarp. The tarp itself does not protect from ground cold; a sleeping pad or other insulating layer is always needed in addition.
Variants
- With trekking poles instead of trees
- Stand two trekking poles at the ends and guy the ridgeline out over them. The poles only stay upright under compression if the guying pulls in line with the ridgeline.
- Low storm A-frame
- Rig the ridgeline low and stake the sides to the ground. Less room, but much less surface for the wind.
Common mistakes
- Turning the broad side into the wind
- Rigging the ridgeline too high so rain drives in from the side
- Slack panels where water pools
- Pitching under dead branches
- Going without ground insulation
Limits and risks
- No protection from ground cold
- Limited protection in storms and driving rain
- No insect protection
Material alternatives
Derived from material properties: a substitute must have all relevant properties. Observe the notes on the substitute.
- Tarp
- Plastic sheet / large bin bag (Tears easily; never pull over the head (suffocation risk).), Emergency blanket (Tears easily once punctured; short-term shelter only.), Document folder (waterproof) (Store securely – contains sensitive personal data.), Rain poncho (When used as a shelter, it no longer protects your body from rain.), Bivy bag (Never fully close off the face.), Tent (Do not cook or heat inside the tent (fire and carbon monoxide danger).), Heavy-duty bin bag (large) (Suffocation risk: never pull plastic bags over the head or face and keep them away from small children.), Group shelter bag (Airtight – ventilate regularly.)
- Paracord
- Rope (Never use unknown or damaged rope for life-safety purposes.)
- Rope
- Paracord (Not a climbing or safety rope.)
- Tent stakes
- Sturdy sticks / poles (Do not cut live wood where prohibited.)
- Trekking poles
- Sturdy sticks / poles (Do not cut live wood where prohibited.), Tent pole repair sleeve (Temporary only – have broken sections replaced at home.)
- Sleeping pad
- Dry leaves, grass or conifer boughs (Collect only where allowed; no protected plants. Check for ticks and insects.), Backpack, Dry spare clothing (Carry it in waterproof packaging – wet clothing barely insulates.), Wool blanket / duvet (Keep away from candles, stoves and heaters.), Insulated cool box (Keeps cold only for a limited time; without ice packs or ice it is not a fridge.), Sleeping bag (Do not store compressed long-term; do not pack away damp.), Newspaper and cardboard (Flammable – keep away from candles, stoves, heaters and embers.), Insulated cooking box (hay box, thermal cooker) (Never put open flame or embers inside – only the hot, closed pot.)
Results come exclusively from structured entries. No improvised instructions are generated.
Sources
Headquarters, Department of the Army (USA) (2002): FM 3-05.70 Survival
Building simple shelters from sheets and lines