Tarp C-fly (lean-to with built-in groundsheet)
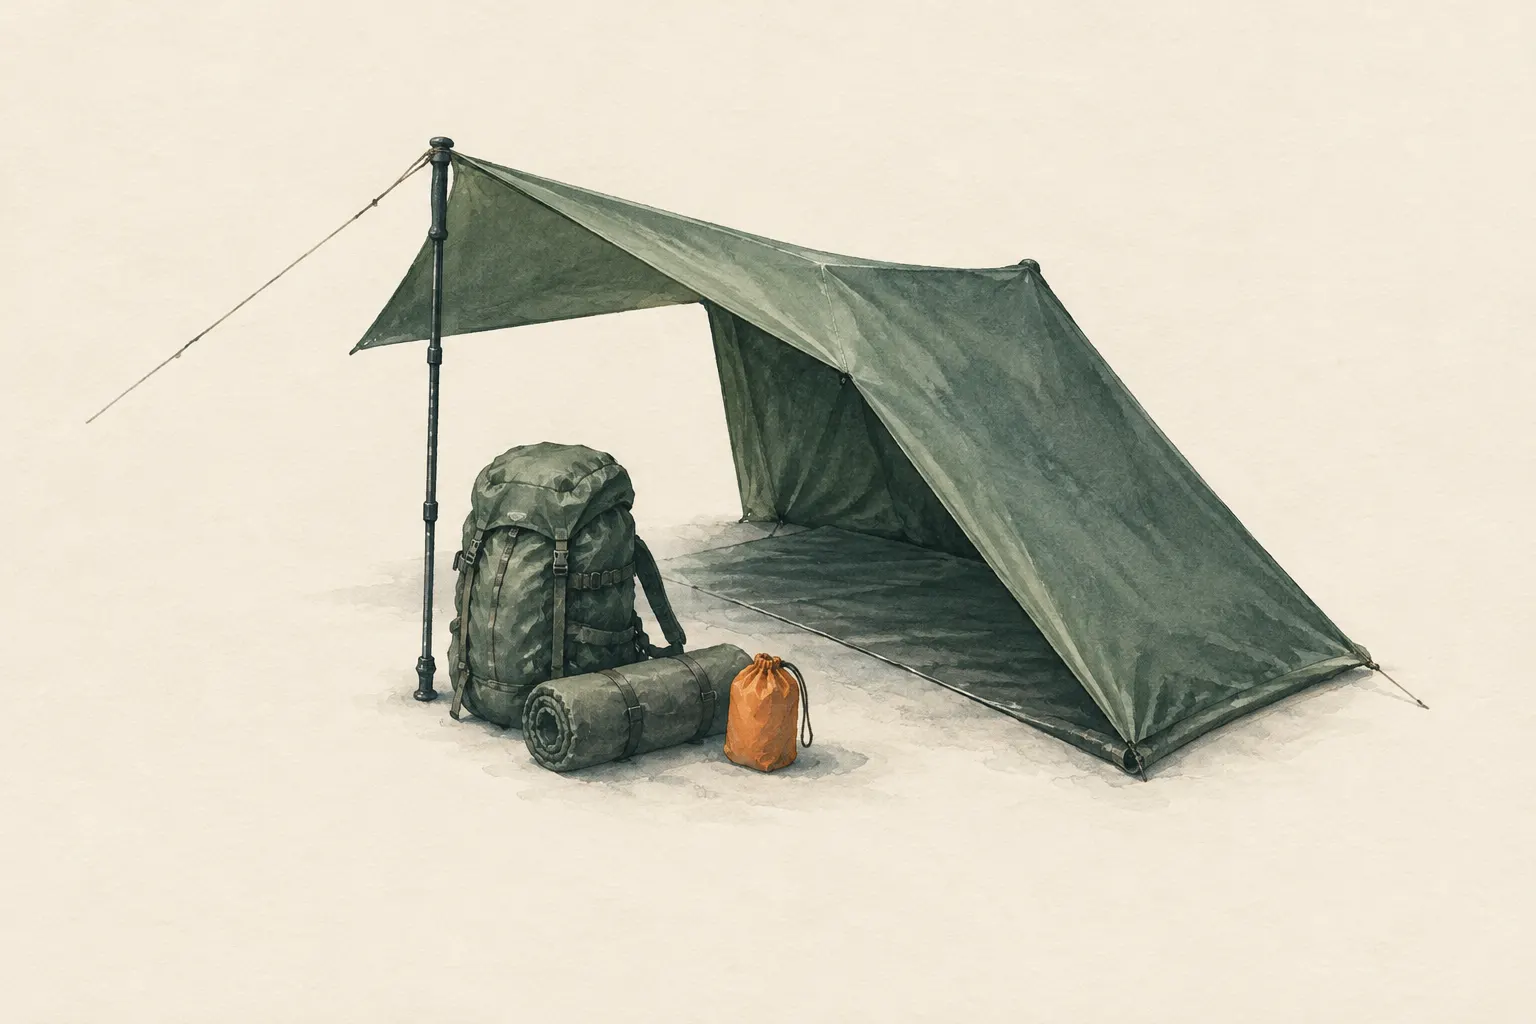
In a C-fly the tarp hangs over a ridgeline: a short part forms a front awning, the long part runs down to the ground at the back and is folded forward underneath as a groundsheet. In profile it resembles a "C". The pitch shields your back from wind, keeps the floor dry and stays open at the front.
- About 15–25 minutes
Explained simply
In a C-fly a single large tarp does three things at once: it is roof, back wall and floor. You hang the tarp over a line between two trees. At the front only a small piece hangs down, like the peak of a cap. At the back the tarp runs down at an angle to the ground – and you fold the remaining piece forward underneath you as a groundsheet.
From the side it looks like the letter “C”. The wind comes from behind and bounces off the back wall, the front stays completely open, and you sit or lie on dry ground.
But watch out: the groundsheet only keeps out wet, not cold. You still need a sleeping pad. And because the front is open, the C-fly only works if the wind really does come from behind.
How it works
The ridgeline runs across the wind between two trees, at about chest to shoulder height. The tarp lies unevenly over it: a short awning hangs at the front, and the long part drops steeply to the ground at the back. This back wall sheds rain backwards and keeps the wind off your back.
At the ground, the back wall is staked tight. The rest of the tarp is folded forward under the roof and forms the groundsheet. It separates sleeping area and gear from damp ground. In profile – seen from the side – this gives the shape of a “C”.
The difference between wet protection and insulation is important: the groundsheet keeps moisture away, but it is far too thin to trap air. It does not help against the cold of the ground. For that you need a sleeping pad or another insulating layer.
What really matters
The back wall must drop steeply. If it is too shallow, rain collects in sags on the tarp, the weight pulls it down further, and water can run inside. Stake the back wall tight along the ground line.
Pay particular attention to the fold between back wall and groundsheet. It should sit slightly raised so rainwater running down the back wall does not flow onto the groundsheet. Choose a level spot: on a slope, water runs under the groundsheet or even onto it.
Guy the short awning forwards and down with two lines. It protects the entrance area from rain from above. With a small tarp, the awning can be dropped; the pitch then becomes a lean-to with a folded groundsheet.
When it makes sense – and when not
The C-fly suits one or two people without a separate groundsheet, steady wind from behind and a daytime rest spot facing forward. It offers lots of space for sitting and good ventilation; thanks to the open front, hardly any condensation forms.
It is unsuitable in shifting wind or driving rain from the front, on slopes and with small tarps. Because the front is open, it becomes the exposed face when the wind changes.
As with the simple lean-to: if the wind shifts, you have to re-pitch. In uncertain weather an A-frame or a closed pitch is usually more robust.
Safety: what to watch out for
Look up before pitching and use only healthy, living trees as anchors. Dead trees or hanging branches can fall in wind or under snow or ice load.
The open front invites you to make a fire in front of it. But no stove, candle or fire under or directly next to the tarp: synthetic material melts and burns easily, and carbon monoxide can collect under the sheet. Where fire is allowed at all, local rules and fire bans apply.
Also check the rules on wild camping and bivouacking, do not damage living trees and leave the site without a trace. And remember: the groundsheet does not protect against ground cold – a sleeping pad belongs on every night out.
How to practise it
The C-fly needs a large enough tarp, because it has to cover roof, back wall and floor. Try at home whether your tarp is long enough: mentally divide it into three parts – short awning, back wall, groundsheet – and see whether you can lie on it.
Then practise pitching it in a garden or park. Pay particular attention to the fold and to how steep the back wall is. As a test, pour some water onto the back wall and watch where it runs.
Also practise converting it into an A-frame. If you know how to switch quickly, you are well prepared for a change in wind during the night.
Step by step
Rig the ridgeline
Tie a line between two trees at about chest to shoulder height, across the wind direction.
- 1
Rig the ridgeline
Tie a line between two trees at about chest to shoulder height, across the wind direction.
- 2
Drape the tarp unevenly
Lay the tarp over the line so that only a short awning hangs at the front and the long part reaches the ground at the back.
- 3
Stake the back wall
Stake the back wall tightly along the ground line so that it falls steeply.
- 4
Fold the floor
Fold the rest of the tarp forward under the roof as a groundsheet. The fold should sit slightly raised so rainwater does not run in.
- 5
Guy out the awning
Guy the short awning forwards and down with two lines.
Common mistakes
- Open side turned into the wind
- Groundsheet on a slope – water runs under or onto it
- Back wall too shallow – rain pools in sags
- Mistaking the groundsheet for insulation
Quick view
Materials
Tarp
Long enough for roof, back wall and floor
Paracord
Ridgeline and guylines
Not a climbing or safety rope.
Tent stakes
Sleeping pad
Suitable for
- One or two people without a separate groundsheet
- Steady wind from behind
- A daytime rest spot facing forward
Not suitable for
- Shifting wind or driving rain from the front
- Slopes where water runs under the groundsheet
- Small tarps
Prerequisites
- Two anchor points for the ridgeline
- A tensioning hitch and a way to attach the ridgeline
Safety
- Wild camping, bivouacking, collecting material and fires are regulated very differently from region to region. Check local rules, do not damage living trees and leave the site without a trace.
How it works
A single tarp does three jobs: roof, wind wall and floor. The back wall drops steeply from the ridge to the ground and sheds rain backwards; the folded part separates the sleeping area from damp ground. The groundsheet does not replace insulation – it only keeps moisture away.
Advantages
- Groundsheet without extra weight
- Good view and ventilation to the front
- Lots of space for sitting
Disadvantages
- Open to the front
- Needs a large tarp
- Sensitive to shifting wind
Deep knowledge
Background
The C-fly is a development of the lean-to that is common in bushcraft and tarp guides. It makes maximum use of a larger tarp but relies on a dependable wind direction.
As with the simple lean-to: if the wind shifts, the pitch has to be changed. In uncertain weather an A-frame or a closed pitch is usually more robust.
Variants
- Without awning
- With a small tarp the awning is dropped; the pitch then becomes a lean-to with a folded groundsheet.
Common mistakes
- Open side turned into the wind
- Groundsheet on a slope – water runs under or onto it
- Back wall too shallow – rain pools in sags
- Mistaking the groundsheet for insulation
Limits and risks
- The groundsheet does not protect against ground cold
- No measurements – they depend on tarp size
Material alternatives
Derived from material properties: a substitute must have all relevant properties. Observe the notes on the substitute.
- Tarp
- Plastic sheet / large bin bag (Tears easily; never pull over the head (suffocation risk).), Emergency blanket (Tears easily once punctured; short-term shelter only.), Document folder (waterproof) (Store securely – contains sensitive personal data.), Rain poncho (When used as a shelter, it no longer protects your body from rain.), Bivy bag (Never fully close off the face.), Tent (Do not cook or heat inside the tent (fire and carbon monoxide danger).), Heavy-duty bin bag (large) (Suffocation risk: never pull plastic bags over the head or face and keep them away from small children.), Group shelter bag (Airtight – ventilate regularly.)
- Paracord
- Rope (Never use unknown or damaged rope for life-safety purposes.)
- Tent stakes
- Sturdy sticks / poles (Do not cut live wood where prohibited.)
- Sleeping pad
- Dry leaves, grass or conifer boughs (Collect only where allowed; no protected plants. Check for ticks and insects.), Backpack, Dry spare clothing (Carry it in waterproof packaging – wet clothing barely insulates.), Wool blanket / duvet (Keep away from candles, stoves and heaters.), Insulated cool box (Keeps cold only for a limited time; without ice packs or ice it is not a fridge.), Sleeping bag (Do not store compressed long-term; do not pack away damp.), Newspaper and cardboard (Flammable – keep away from candles, stoves, heaters and embers.), Insulated cooking box (hay box, thermal cooker) (Never put open flame or embers inside – only the hot, closed pot.)
Results come exclusively from structured entries. No improvised instructions are generated.
Sources
Headquarters, Department of the Army (USA) (2002): FM 3-05.70 Survival
Principles of improvised shelters, site selection and shelter construction
Wilderness & Environmental Medicine (Wilderness Medical Society) (2019): Wilderness Medical Society Clinical Practice Guidelines for the Out-of-Hospital Evaluation and Treatment of Accidental Hypothermia: 2019 Update
Wind, wet and ground contact as factors in hypothermia