Microspikes, snowshoes, crampons: what for what?
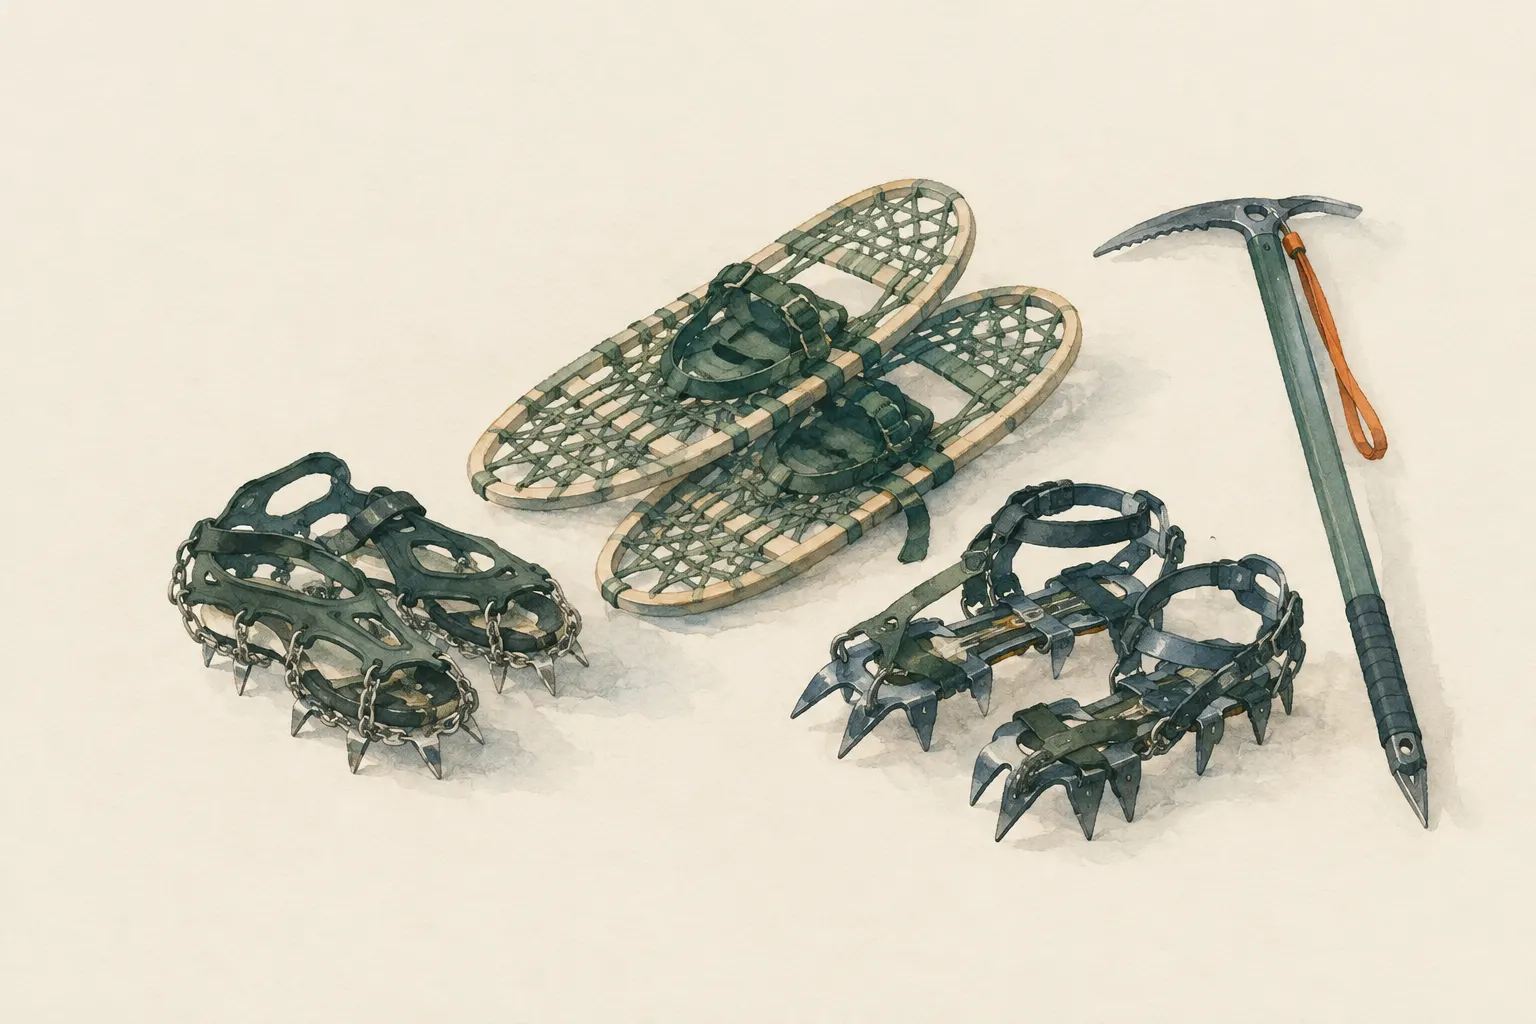
On icy paths microspikes give much more grip than lugged soles. Snowshoes are meant for deep snow, crampons together with an ice axe for steep ice and hard snow – and these require training. Microspikes are no substitute for crampons, and none of this gear protects against avalanches.
- 10 minutes reading; a course for crampons
Explained simply
On ice, normal shoe soles slip because the rubber cannot bite into the ice – a bit like an eraser on a pane of glass. Microspikes are chains or rubber harnesses with short metal points that you pull over your shoes. The points bite into the ice so you walk much more securely on icy paths.
For deep snow there are snowshoes. They are like large, flat plates under your feet and spread your weight so you don't sink in so deep – just as a duck with its broad feet doesn't sink into mud. Crampons have long, strong points for steep ice and hard snow in high mountains. They are used together with an ice axe, and only by people who have been trained.
The most important point: none of this gear protects against avalanches. And microspikes are no substitute for crampons – they don't belong on steep ice or snow slopes where you could fall.
How it works
Rubber soles with tread grip on earth, rock and loose snow because the tread presses into the ground. On ice that doesn't work: the surface is hard and smooth, and often there is a thin film of water on it that acts like a lubricant. Metal points, by contrast, go a little way into the ice and so give grip.
Microspikes have short spikes on chains held between elastic rubber harnesses. They grip the surface of ice and packed snow. Crampons have much longer points, often including forward-facing front points, and are firmly attached to a compatible boot. That is why they also grip hard snow and steep ice.
Snowshoes work quite differently. They increase the area over which your weight rests on the snow. The larger the area, the less pressure on each patch of snow – and the less you sink in. Many snowshoes also have claws under the foot and a heel lift that raises the heel when climbing.
What for what?
Microspikes are meant for icy hiking paths, forest roads and flat to moderately steep paths, and also for slippery pavements in everyday life. They are light, quick to put on and fit over many normal shoes. The size must match the shoe; try them on at home before you set off.
Snowshoes are meant for deep, soft snow in which you would otherwise sink deeply with every step. It is best to adjust the binding at home in peace, with the shoes you will wear on the trip. On hard, icy ground or on steep slopes snowshoes are often more of a hindrance.
Crampons belong in high mountains, on glaciers, steep hard-snow fields and ice. They need a compatible, sufficiently stiff boot, an ice axe and above all training. A course with an alpine club or a mountain school teaches the walking technique and how to stop a fall with the axe. Anyone who has not learned this does not belong in that terrain.
Safety: what to watch out for
Only use crampons and an ice axe after training. A fall on steep ice or hard snow speeds up very quickly, and without practised technique it often cannot be stopped. For the same reason microspikes don't belong on hard-snow or ice slopes with a fall hazard: their short spikes don't hold reliably there.
No traction aid protects against avalanches. Good gear can even tempt people into terrain they would otherwise avoid. Avalanche warning services publish bulletins using a danger scale that is standard across Europe. Enter avalanche terrain only with knowledge of the conditions, suitable equipment and training – otherwise avoid it. When in doubt, turning back is always right.
Spikes and points are sharp. Carry them in a protective bag so they don't damage anything in the pack. Take care not to catch them on your own trouser legs – that can cause a fall. On rock, tarmac and smooth tiles walk carefully or take the microspikes off, because metal points slip easily there.
How to walk with them
With microspikes you walk with fairly short steps and place your foot as flat as possible so that as many spikes as possible grip at the same time. Lift your feet with every step instead of shuffling – shuffling feet catch easily. Overlong strides throw you off balance.
Don't try new gear for the first time on the trip. Put microspikes or snowshoes on at home, adjust them and walk a little way in them, for example on an icy path nearby. That way you notice whether everything fits and don't have to fiddle about in the snow with cold fingers later.
After use, dry the gear so nothing rusts. While doing so, check whether points are bent, whether the rubber has cracks and whether the chain links are in order. Replace damaged parts before you go out again.
Good to know
Crampons have existed for a long time; mountaineering handbooks such as “Mountaineering: The Freedom of the Hills” describe their technique in detail and stress practising under instruction. Microspikes are a more recent aid, mainly intended for winter walks on paths.
The biggest danger with traction aids is a false sense of security. They make walking on ice safer, but they do not change the terrain. A steep slope stays steep and an avalanche hazard remains. Anyone who keeps this in mind can enjoy winter a lot with microspikes and snowshoes.
Step by step
Assess conditions
Icy paths, deep fresh snow or steep ice? The gear depends on this – and on whether to turn back.
- 1
Assess conditions
Icy paths, deep fresh snow or steep ice? The gear depends on this – and on whether to turn back.
- 2
Microspikes
For icy, flat to moderately steep paths. Size to match the footwear; try them on at home before the trip.
- 3
Snowshoes
For deep snow. Adjust the binding at home; heel lifts help when climbing.
- 4
Crampons
Only with compatible footwear, an ice axe and training. Practise technique and self-arrest under instruction.
- 5
Care
Dry after use and check for bent points, cracks in the rubber and chain links.
Common mistakes
- Using microspikes on alpine routes
- Trying gear on for the first time on the trail
- Overlong strides and shuffling with spikes
- Ignoring avalanche conditions because the gear is good
Quick view
Materials
Traction devices (microspikes)
No substitute for crampons and an ice axe on steep or glaciated terrain.
Trekking poles
Sturdy closed shoes
Suitable for
- Icy hiking paths and forest roads
- Winter walking on flat to moderately steep paths
- Icy streets in everyday life (microspikes)
Not suitable for
- Steep ice, glaciers, avalanche terrain without training and equipment
- Microspikes on hard snow or ice slopes with a fall hazard
Prerequisites
- Suitable sturdy footwear
- Avalanche bulletin and weather checked where relevant
- For crampons and ice axe: training by qualified people
Safety
- Spikes and points are sharp: carry them in a protective bag, do not catch trouser legs, walk carefully on rock and tarmac.
How it works
Rubber and tread lose grip on ice because they cannot penetrate it. Short spikes bite into the ice surface; longer crampon points also grip hard snow and steep ice. Snowshoes spread the weight over a larger area so you sink in less.
Advantages
- Much more grip on ice
- Light and quick to put on (microspikes)
Disadvantages
- Can create a false sense of security
- Crampons require training
Deep knowledge
Background
"Mountaineering: The Freedom of the Hills" covers crampon and ice-axe technique in detail and stresses practising under instruction. Microspikes are a more recent aid for winter walking on paths.
Alpine clubs and mountain schools offer courses; avalanche warning services publish bulletins.
Variants
- Ice in town
- Light shoe spikes also help on icy pavements. Take them off indoors and on smooth tiles.
Common mistakes
- Using microspikes on alpine routes
- Trying gear on for the first time on the trail
- Overlong strides and shuffling with spikes
- Ignoring avalanche conditions because the gear is good
Limits and risks
- No instructions for crampon or ice-axe technique
- No avalanche education – see the environments world
Material alternatives
Derived from material properties: a substitute must have all relevant properties. Observe the notes on the substitute.
- Trekking poles
- Sturdy sticks / poles (Do not cut live wood where prohibited.), Tent pole repair sleeve (Temporary only – have broken sections replaced at home.)
Results come exclusively from structured entries. No improvised instructions are generated.
Sources
The Mountaineers Books (2017): Mountaineering: The Freedom of the Hills, 9th edition
Crampon and ice-axe technique, practising under instruction
European Avalanche Warning Services (EAWS): European Avalanche Danger Scale
Avalanche danger levels as a basis for trip decisions