Bow drill friction fire
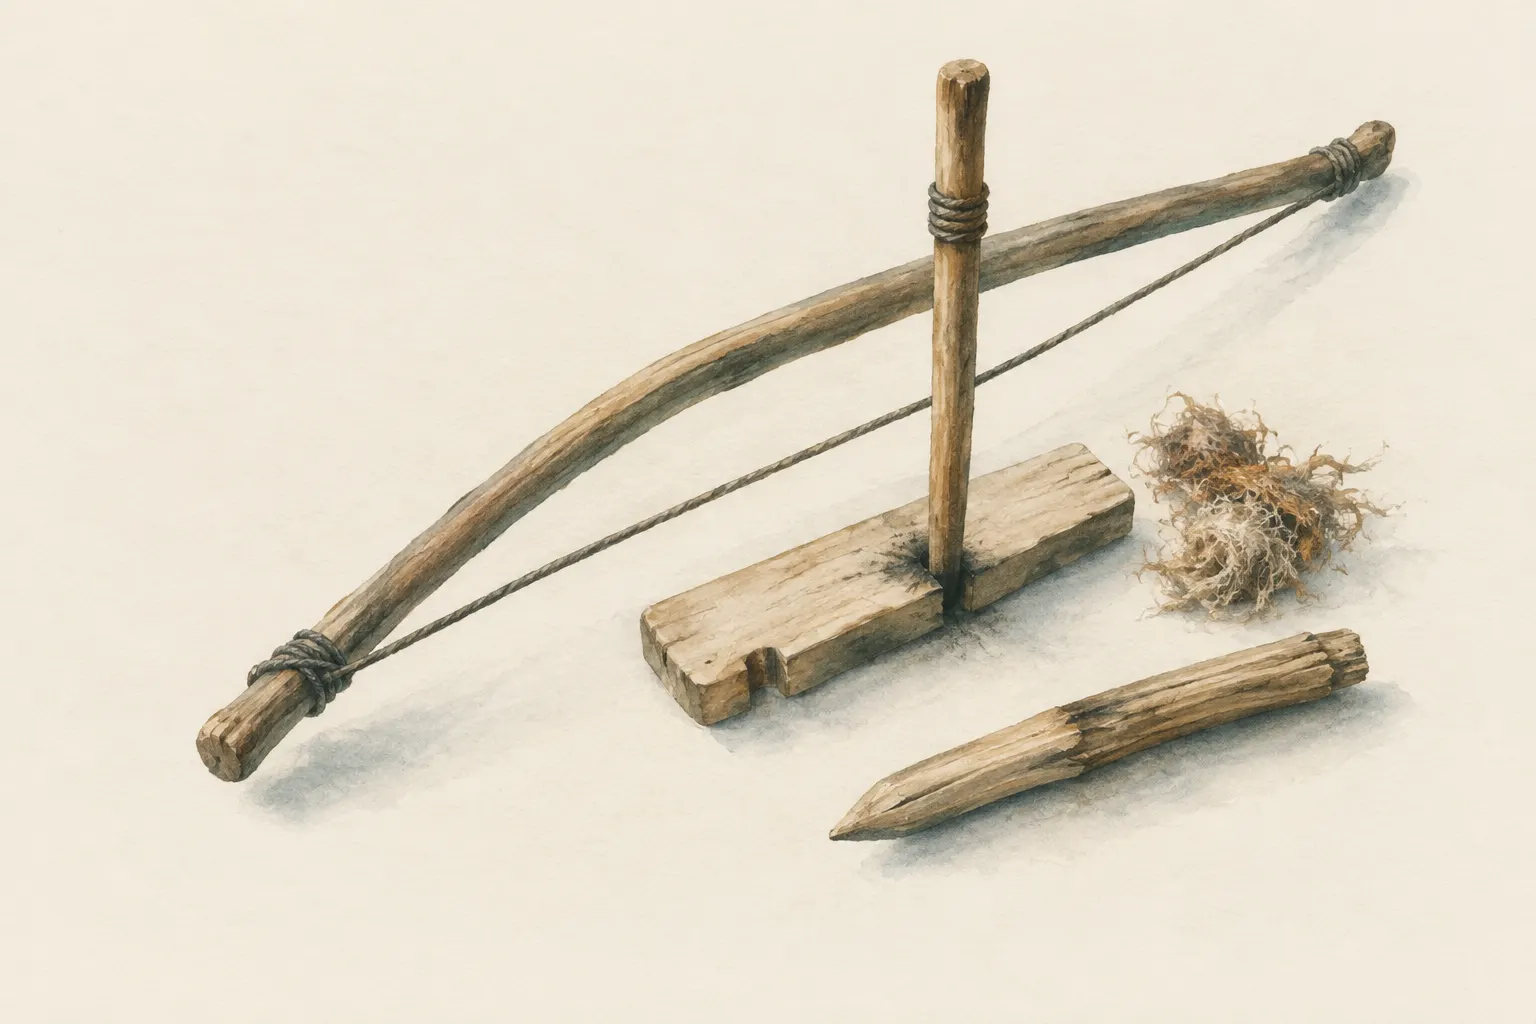
In the bow drill, a bow with a cord spins a spindle rapidly in a socket in a wooden board. Friction produces hot wood dust that collects in a notch and becomes an ember. The method is well known but demanding: it succeeds only with dry, suitable wood, good technique and a lot of practice – as an emergency plan it is unreliable.
- Building the set often takes an hour or more; each attempt is physically demanding
Explained simply
Rub your hands together really fast – they get warm. The bow drill uses exactly that, only much more strongly. A wooden stick (the spindle) is spun very fast back and forth in a small socket in a wooden board by a bow with a cord wrapped around the spindle. This makes so much friction heat that fine, hot wood dust forms.
This hot wood dust collects in a notch in the board. When it is hot enough, it starts to glow on its own – that is the ember. You carefully put it into a nest of dry fibres and blow until a flame appears.
It sounds easy, but it is hard. It only works with the right, very dry wood and after a lot of practice. That is why the bow drill is an exciting skill, but not a replacement for a lighter or matches in an emergency.
How it works
The set has four parts: the spindle (a straight stick about as thick as a thumb), the board (a flat piece of wood with a socket near the edge), the bearing block (a piece of hardwood or a stone with a small socket, used to hold the top of the spindle and press it down) and the bow (a slightly curved, stiff branch with a cord wrapped once around the spindle).
When you move the bow back and forth, the spindle spins quickly back and forth. Down in the socket, spindle and board rub against each other under pressure; wood fibres are worn off and get hot. The notch in the board collects this hot dust in one place. There it insulates itself, keeps heating up and finally starts to smoulder on its own.
At the top, by contrast, there should be as little friction as possible, so the force and heat end up at the bottom. That is why the bearing block is made of hard, smooth material, and some people put a little grease, wax or green leaf material in the top socket. None of it must reach the bottom end of the spindle, or it will slip there instead of rubbing.
What really matters
The wood decides more than anything else. Spindle and board should be made of dead, bone-dry but not rotten wood of a medium-soft kind that dents slightly under a fingernail. Damp or very resinous wood usually works poorly. Which woods are suitable in your area is best learned from experienced local people and by trying things out.
The notch must reach from the edge of the board to just into the centre of the burned-in socket. It is where the dust collects. Place a dry leaf or a piece of bark under it to catch the ember and transfer it easily later.
Posture matters: one foot on the board, the wrist holding the bearing block braced firmly against your shin so the spindle stays upright and does not wobble. Then drill with long, even bow strokes and increase pressure and speed once dark smoke rises. If the dust in the notch keeps smoking after the spindle has stopped, you have an ember. Let it rest briefly, blow gently, and then transfer it on its base into the prepared tinder bundle.
When it makes sense – and when not
The bow drill is a great skill to learn: it shows how fire works and makes you proud when the first ember succeeds. With practice and good wood it is repeatable. But many experienced instructors stress that it takes weeks or months of practice and that even practised users fail with damp wood.
In a real emergency it is a poor plan A. Building the set often takes an hour or more, every attempt is physically demanding, and a failed attempt costs energy you badly need when cold or exhausted. In wet weather, continuous rain, with injured hands or as darkness falls, it usually fails.
So the rule is: always carry at least two modern ignition sources, such as a lighter and a ferro rod. Anyone who is hypothermic or exhausted first takes care of keeping warm – dry clothing, insulation, shelter – instead of putting their energy into a friction attempt.
Safety: what to watch out for
You need a knife to build the set. Always carve away from your body, sit securely and remember that fatigue increases the risk of injury. While drilling, the bearing block can slip and the spindle can pop out; brace your hand and wrist securely. Blisters on the hands are common – stop in time.
The ember is small and fragile. Prepare the tinder bundle completely before you start drilling, and transfer the ember calmly but promptly. As with any fire: check the local rules and the wildfire danger beforehand. Fire bans apply to practice fires too.
How to practise it
Practise in good conditions: dry weather, dry wood that you may have stored indoors for a few days, and a place where fires are allowed. It is easier with two people: one holds the bearing block and presses, the other works the bow. That way you learn the rhythm without exhausting yourself straight away.
Watch the dust: fine, dark brown to black dust collecting in the notch is a good sign. If no ember forms, the cause is often wood that is too damp, a notch that does not reach the centre of the socket, or stopping too early. Only once it works reliably in good conditions is it worth trying harder conditions.
Step by step
Choose the wood
Dead, bone-dry, not rotten wood of a medium-soft kind for the spindle and board. It should dent slightly under a fingernail. Damp or very resinous wood usually works poorly.
- 1
Choose the wood
Dead, bone-dry, not rotten wood of a medium-soft kind for the spindle and board. It should dent slightly under a fingernail. Damp or very resinous wood usually works poorly.
- 2
Make the parts
Spindle: straight, about thumb-thick, blunt at the bottom, more pointed at the top. Board: flat, about as thick as the spindle. Bearing block: hardwood or stone with a small socket. Bow: a slightly curved, stiff branch with a loosely tensioned cord.
Carve away from your body.
- 3
Burn in the socket
Carve a small depression near the edge of the board, load the spindle and drill until the socket is black and worn in.
- 4
Cut the notch
Cut a wedge-shaped notch from the edge of the board to just into the centre of the socket. Place a dry leaf or piece of bark underneath to catch the ember.
- 5
Drill
Put one foot on the board, brace the wrist holding the bearing block against your shin and drill with long, even bow strokes. Increase pressure and speed once dark smoke appears.
- 6
Check and transfer the ember
If the dust in the notch keeps smoking after the spindle stops, it is an ember. Let it rest briefly, blow gently and transfer it on its base into the tinder bundle; blow it to flame there.
Common mistakes
- Damp, green or rotten wood
- Notch not reaching the centre of the socket
- Spindle wobbling because the wrist is not braced
- Stopping too early before enough dust has formed
- Preparing the tinder bundle only after the ember
- Practising only in ideal conditions and relying on it in an emergency
Quick view
Materials
Bow drill set (bow, spindle, hearth board, bearing block)
Use only dry wood.
Requires a lot of practice.
Knife (fixed or locking blade)
Cut away from your body.
Rules on carrying knives differ by region – check local rules.
Paracord
Or another strong cord, e.g. a bootlace
Not a climbing or safety rope.
Suitable for
- Skill training in good conditions
- Bushcraft courses
- Understanding friction heat
Not suitable for
- Emergencies without prior practice
- Wet conditions, continuous rain, damp wood
- Exhausted, hypothermic or injured people
- Time pressure as darkness falls
Prerequisites
- Dry, dead, medium-soft wood
- Cord (e.g. paracord or a bootlace)
- A knife and the skill to use it safely
- A prepared tinder bundle
- A lot of prior practice
Safety
- The ember is small and fragile. Have the tinder bundle completely ready beforehand and transfer the ember calmly but promptly.
- Friction fire is not a reliable emergency plan. It succeeds only with suitable, dry wood and a lot of practice, and it costs a lot of energy. Always carry at least two modern ignition sources.
- When carving and notching, always work away from your body and sit securely. Fatigue increases the risk of injury.
- The bearing block can slip and the spindle can pop out. Brace your hand and wrist securely; blisters on the hands are common.
How it works
Rapid rotation under pressure abrades wood fibres and heats them. The notch in the board collects this hot dust in one place, where it insulates itself and keeps heating until it smoulders on its own. The bearing block on top should have as little friction as possible so heat is generated only at the bottom.
Advantages
- Possible without a carried ignition source
- Repeatable with practice and good wood
- Teaches a deep understanding of fire
Disadvantages
- High energy and time demand
- Strongly dependent on wood type and dryness
- Often unsuccessful in wet and cold conditions
- Risk of injury from knife work
Deep knowledge
Background
The bow drill is one of the best-known friction methods and is described in military and bushcraft manuals. Many experienced instructors stress that the method takes weeks or months of practice and that even practised users fail with damp wood.
In a real emergency, the energy a failed attempt costs is a genuine drawback: anyone who is hypothermic or exhausted should first conserve warmth and rely on carried ignition sources.
Variants
- Two people
- One person holds the bearing block and applies pressure, the other works the bow. This shares the effort and makes even strokes easier.
- Lubricate the bearing block
- A little grease, wax or green leaf material in the top socket reduces friction at the top. None of it must reach the bottom end of the spindle.
Common mistakes
- Damp, green or rotten wood
- Notch not reaching the centre of the socket
- Spindle wobbling because the wrist is not braced
- Stopping too early before enough dust has formed
- Preparing the tinder bundle only after the ember
- Practising only in ideal conditions and relying on it in an emergency
Limits and risks
- Not a reliable substitute for a lighter, matches or ferro rod
- Choosing wood requires local experience
- Hardly possible with injured hands
Material alternatives
Derived from material properties: a substitute must have all relevant properties. Observe the notes on the substitute.
- Bow drill set (bow, spindle, hearth board, bearing block)
- Lighter, matches or ferro rod (Observe local fire bans.), Ferro rod (Practise before you need it.), Fire striker and hard stone (Carbon steel, not stainless.), Burning lens / magnifier (Never leave lying in the sun – fire risk.), Fire piston (Maintain the seal.)
- Paracord
- Rope (Never use unknown or damaged rope for life-safety purposes.)
Results come exclusively from structured entries. No improvised instructions are generated.
Sources
Headquarters, Department of the Army (USA) (2002): FM 3-05.70 Survival
Bow and drill: construction and procedure
Ray Mears – Hodder & Stoughton (2002): Bushcraft
Friction fire, choice of wood and ember transfer
Mors L. Kochanski – Lone Pine Publishing: Bushcraft: Outdoor Skills and Wilderness Survival
Bow drill friction fire