Wooden tools: digging stick, mallet and wooden wedge
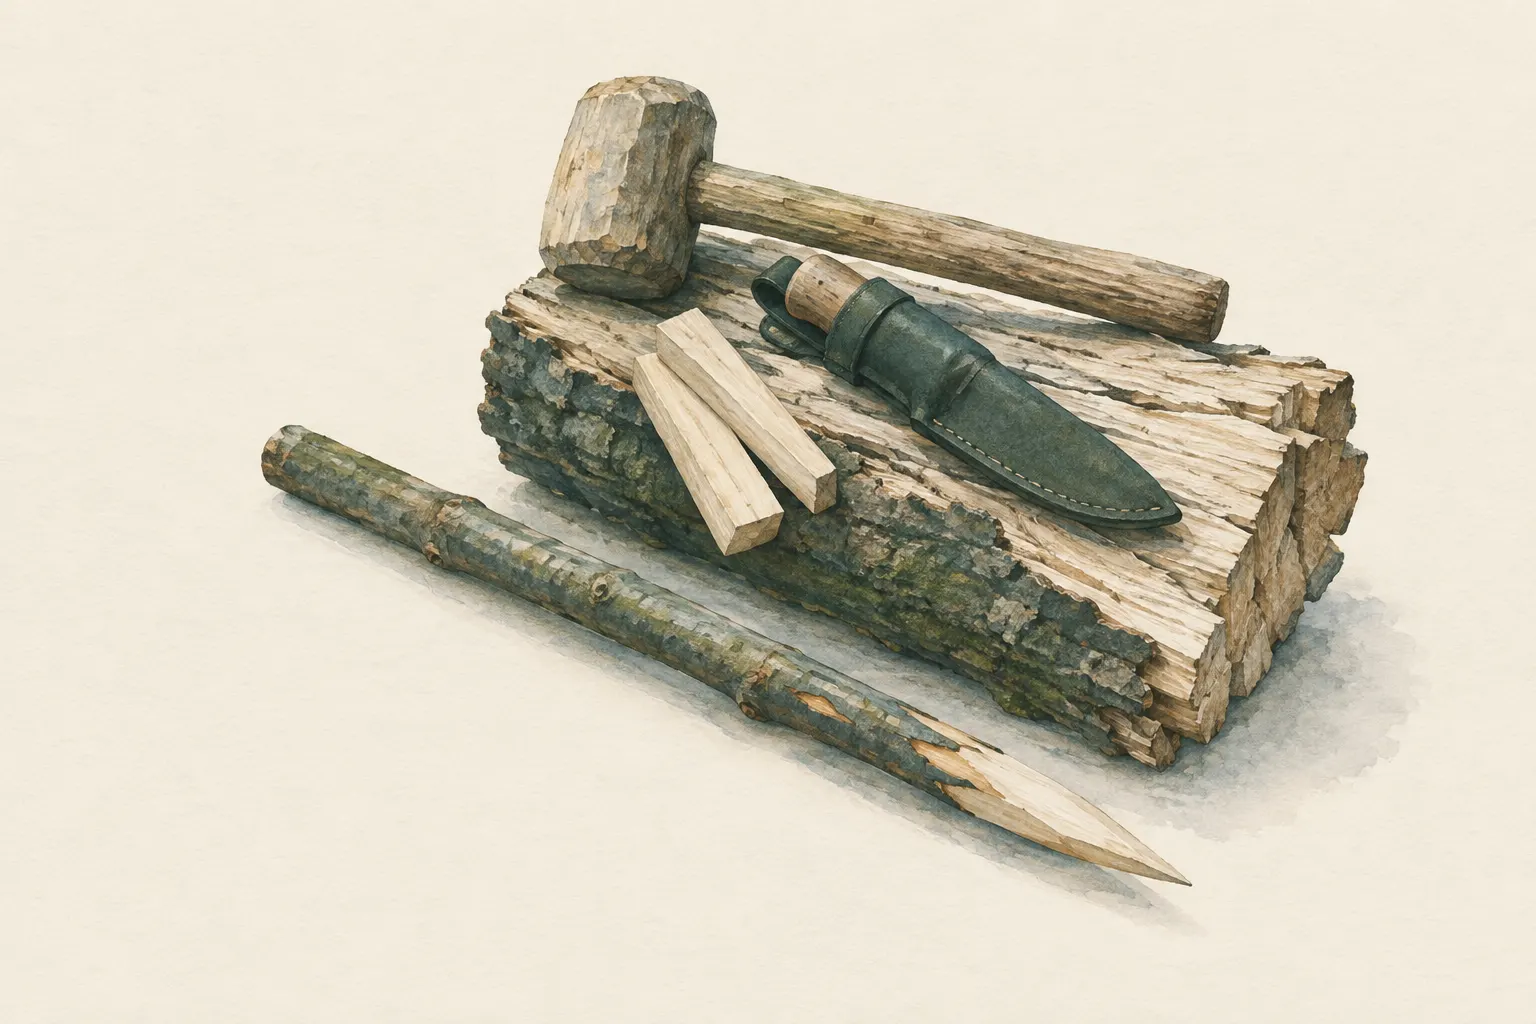
With a knife and saw, three simple tools can be made from hard wood: a digging stick with a flat, briefly fire-hardened tip for loosening soil, a mallet from a log section for striking knife spines, stakes and wedges, and wooden wedges for splitting logs without a big axe. What matters is hard, sound wood, safe knife handling and fire-hardening only so briefly that the wood does not char.
- 30–90 minutes per tool
Explained simply
Before there was metal, people made their tools from wood and stone. You can carve three of them yourself with a knife and a saw: a digging stick, a wooden hammer called a mallet, and wooden wedges for splitting wood.
The digging stick is a strong rod with a flat tip. You use it to loosen soil, a bit like a small spade. You hold the tip briefly over the embers of a fire – that dries it and makes it a little harder. But only briefly: if the wood turns black, it breaks more easily.
With the mallet you tap wooden wedges into a log. The wedges push the wood apart until it splits – that way you split a log without a big axe. When carving, always: cut away from your body and keep your distance from others.
How it works
Wood consists of long fibres running in the direction the tree grew. Along these fibres it splits easily; across them it is very strong. That is why a wedge set into the end grain splits a log lengthwise: it turns every blow from above into a large sideways force. Several wedges in turn open the split further and further.
A mallet works through its mass. A thick, heavy head on a short handle delivers a lot of force with each blow without you having to swing far. Because the head is made of wood, it damages neither knife spines nor wooden wedges – unlike a metal hammer.
In fire-hardening, the heat dries out the outer layer of the tip strongly, and the wood becomes somewhat firmer there. If it gets too hot it chars: charcoal is brittle and breaks easily. So fire-hardening is careful roasting over the embers, not burning in the flame – and it does not make wood as hard as metal.
What really matters
The wood decides everything. You want hard, straight-grown hardwood without rot, cracks or big knots, such as ash, beech, oak or hornbeam. Rotten wood sounds dull when tapped and breaks at the first blow. Knotty pieces with twisted grain split badly and are unsuitable for wedges and splitting.
The digging-stick tip is carved flat like a chisel, not needle-thin: two sloping faces over about a hand's length and a narrow, straight edge at the front. A thin point snaps at the first levering. On the mallet the stop cut decides where the grip begins; it is no deeper than a quarter of the thickness so that the head does not break off.
On wedges the head stays wide and straight so the mallet hits cleanly. A slender wedge enters more easily, a thick one splits more powerfully – ideally you have both. Let fresh wedges of green wood dry for a few days, otherwise they mushroom when struck.
Safety: what to watch out for
Most carving injuries are cuts to your own hand or leg. So you carve seated, with the work to the side in front of your knee, always away from your body, with the holding hand behind the blade. Never carve between your thighs – large blood vessels run there. An arm's length of space stays clear around you, and the knife goes into its sheath after every task.
When fire-hardening, work over the embers, not in the flames, and never leave the stick lying unattended in the fire. The tip is very hot afterwards and must cool down. Extinguishing water stands ready, and the fire is put out completely at the end.
When splitting, wedges can spring out and wood can splinter. Wear safety glasses, take your fingers off the wedge before striking and keep other people well away. Never strike a wedge with the edge of an axe or knife – that is what the mallet is for.
When it makes sense – and when not
Wooden tools make sense in a camp of several days when a spade or hammer is missing or should be spared: driving in posts for a raised bed, loosening soil for a fire pit, splitting wood for building. A mallet and two wedges spare knife and hatchet, because those tools are not misused as hammers.
A digging stick does not replace a spade: it is slower and breaks in stony ground. Knotty wood is hard to split even with wedges. And the tools in this entry are working tools, not weapons or hunting gear. Dig and cut wood only where it is allowed.
Good to know
Digging sticks are among humanity's oldest tools and are still used in some cultures today, for example to dig up roots and tubers. Military survival manuals describe fire-hardening wooden points and expressly warn against charring the wood.
Splitting with wedges is an old technique once used to make boards, shingles and fence posts. The US Forest Service axe manual warns against striking metal wedges with an axe, because axe head and wedge get damaged and fragments can fly. A wooden mallet on a wooden wedge, by contrast, is the gentle combination.
Step by step
Choose the right wood
Look for hard, straight-grown hardwood without rot, cracks or big knots – for example ash, beech, oak or hornbeam. For the digging stick you need a rod about wrist-thick and a little longer than your arm. For the mallet a log section about as long as your forearm and as thick as your calf. For wedges pieces about as long as your hand. Use fallen, sound dead wood or cut only with permission.
Caution: Rotten wood breaks at the first blow – tap it: it sounds dull.
- 1
Choose the right wood
Look for hard, straight-grown hardwood without rot, cracks or big knots – for example ash, beech, oak or hornbeam. For the digging stick you need a rod about wrist-thick and a little longer than your arm. For the mallet a log section about as long as your forearm and as thick as your calf. For wedges pieces about as long as your hand. Use fallen, sound dead wood or cut only with permission.
Rotten wood breaks at the first blow – tap it: it sounds dull.
- 2
Carve safely
Sit on a block, legs apart, the work to the side in front of your knee. There is an arm's length of space around you. Always carve away from your body in long, shallow strokes; the hand holding the wood stays behind the blade. Use the saw to cut to length, not the knife. Put the knife in its sheath after every task.
Never carve towards your body or between your thighs.
- 3
Shape the digging stick
Carve the thick end of the rod into a flat, chisel-like tip, not a thin needle: two sloping faces over about a hand's length, with a narrow, straight edge at the front. That way the stick levers soil without snapping. Round off the other end so it does not press into your hand. Remove bark and branch stubs from the grip part.
- 4
Fire-harden the tip briefly
Hold the tip at a distance over the embers, not in the flames, and keep turning the stick. First moisture hisses out of the wood, then the surface turns light brown. That is exactly when you stop. Blackened, charred wood is brittle – scrape charred spots off with the knife. Let the tip cool before touching it. Hardening helps a little, but it does not turn wood into metal.
Do not let it char and never leave the stick unattended in the fire.
- 5
Work with the digging stick
Push the tip into the ground at an angle and lever the soil loose backwards, then scrape or scoop the loose soil out with your hand or a piece of bark. Work in small bites. In stony ground or at thick roots you will break the tip – choose another spot there. Dig only where you are allowed and fill holes in again afterwards.
- 6
A mallet from a log section
Mark a grip length on the log section (about a hand's width plus thumb) and saw a shallow stop cut all round there, no deeper than a quarter of the thickness. Then split or carve the wood away from the end up to the stop cut until you have a grip that sits well in your hand. The head stays thick and heavy. Round off the edges of the grip. The mallet is for knife spines, stakes and wedges – never for the edge.
Do not make the stop cut too deep – or the head will break off.
- 7
Carve wooden wedges
Carve two or three wedges from hand-length pieces of hard wood: two broad faces that taper from a flat head to a blunt edge. A long, slender wedge enters more easily, a short, thick one splits more powerfully. The head stays wide and straight so the mallet hits cleanly. Let fresh wedges dry for a few days before using them hard.
- 8
Split with wedges
Stand the log firmly upright or lay it securely on the ground. Set the first wedge into an existing crack in the end grain and drive it in with short, controlled blows. When a split opens, set the second wedge further back into it and drive it in, then the first one comes loose – that way you work your way along the log. Wear safety glasses, keep fingers off the wedge, keep other people well away.
Never strike the wedge with an axe edge or knife; wedges can spring out.
Common mistakes
- Using rotten or knotty wood
- Carving towards your body
- Charring the digging-stick tip black
- A needle-thin tip that snaps at once
- Stop cut on the mallet too deep
- Striking wedges with the hatchet or knife
- Splitting without safety glasses, onlookers too close
Quick view
Materials
Knife (fixed or locking blade)
Fixed-blade knife
Cut away from your body.
Rules on carrying knives differ by region – check local rules.
Folding saw
Fold or cover the blade after use; saw teeth are very sharp.
Cut-resistant glove
For the hand holding the wood
Reduces cuts but does not prevent stab injuries.
Close-fitting safety goggles
When splitting with wedges
Chopping block
Must be level and stable; do not use a wobbling block.
Water for extinguishing (bucket, canister or pot)
When fire-hardening
Have several litres ready before lighting.
Suitable for
- Camps without a spade or hammer
- Splitting logs without a big axe
- Driving in posts and pegs
- Carving practice
Not suitable for
- Stony ground – the digging stick breaks
- Hard, knotty wood for wedge splitting
- As a weapon or hunting tool – that is not what this is about
- Children without supervision
Prerequisites
- Safe use of knife and saw
- A fire with embers, where fires are allowed
- Permission to use or cut wood
Safety
- Always carve away from your body, seated, with the blade in front of the knee and not between your legs. An arm's length of space around you (the “blood circle”), nobody inside it. Sheathe the knife as soon as you put it down.
- When fire-hardening, work only over embers, not in the flames, and never leave the stick unattended in the fire. The tip gets very hot – let it cool before touching it. Keep extinguishing water ready.
- Wedges can spring out when struck, wood can splinter. Wear safety glasses, keep fingers off the wedge when striking and keep other people well away. Never strike a wedge with the edge of an axe or a knife.
How it works
A wooden tool is only as good as its wood: hard, straight-grown wood without rot withstands blows and leverage. A wedge turns a blow from above into a large sideways force that pushes the wood fibres apart – because wood splits easily along the grain. Brief heating over embers dries the tip of a digging stick and makes it somewhat harder; charring, on the other hand, makes it brittle.
Advantages
- Only knife, saw and wood needed
- Spares knife and axe when splitting and driving
- Good practice for knowledge of wood and carving
Disadvantages
- A digging stick is much slower than a spade
- Wooden tools wear and break
- Carving takes time and effort
Deep knowledge
Background
Digging sticks are among humanity's oldest tools and are still used for digging in many cultures today. Military survival manuals describe fire-hardening wooden points and warn against charring the wood. Bushcraft textbooks show the wooden mallet as a companion to knife and wedge.
Splitting with wedges is an old woodworking technique: wood tears along the grain, and several wedges in turn open even long logs. The US Forest Service axe manual expressly warns against using an axe like a hammer on metal wedges.
Variants
- Quick mallet from a branch
- An arm-thick branch with a natural swelling at the end, sawn to length – done. That is enough for light work such as batoning or pegs.
- Wooden shovel
- Carve a flat shovel with a handle from a wide split board. Together with the digging stick: the stick loosens, the shovel clears.
Common mistakes
- Using rotten or knotty wood
- Carving towards your body
- Charring the digging-stick tip black
- A needle-thin tip that snaps at once
- Stop cut on the mallet too deep
- Striking wedges with the hatchet or knife
- Splitting without safety glasses, onlookers too close
Limits and risks
- No wood identification – if in doubt, test any hard, sound wood
- No instructions for weapons or hunting tools
- Splitting large logs needs practice – start with small pieces
Sources
Headquarters, Department of the Army (USA) (2002): FM 3-05.70 Survival
Improvised tools; fire-hardening wooden points without charring
Ray Mears – Hodder & Stoughton (2002): Bushcraft
Wooden mallets and wedges, safe knife handling
Mors L. Kochanski – Lone Pine Publishing: Bushcraft: Outdoor Skills and Wilderness Survival
Knife technique and woodcraft in camp
USDA Forest Service, Missoula Technology and Development Center (Bernie Weisgerber, Bob Beckley) (1999): An Ax to Grind: A Practical Ax Manual
Safe splitting, do not strike wedges with the axe, keep the striking zone clear